
This project resulted in a useful video editing app for generating youtube videos and vlog-style video essays. The focus here is
on streamlining video editing through automated removal of silence and filler words using advanced audio processing techniques.
The goal is to enhance video quality by cutting unnecessary pauses and verbal crutches, resulting in cleaner, more engaging content.
This application processes video files efficiently and dynamically by allowing the user to tune the triming and cutting parameters for
different recording environments and microphone needs. The output is in mp4 format and can accept any mp4 video to trim and cut.
However, I am aware that handling long video files may introduce new challenges related to
memory management and processing time. Additionally, user customization for what constitutes "filler" is currently limited,
meaning the app's removals are constrained to predefined patterns based on common speech habits. The current focus is to use whisper ai
and moviepy to join audio detection and video editing with machine learning to effectivley streamline the editing process.

The integration of Whisper AI into the video processing workflow is essential for identifying and removing filler words. Whisper, an advanced speech-to-text model, is capable of analyzing audio to detect specific spoken phrases, which can then be used to automate the editing process. In our case, we are particularly interested in filler words such as “um” and silent spaces that tend to disrupt the flow of videos.
model = whisper.load_model("base")Whisper's base model, which is the most basic and popular model, is loaded using the simple command above. The base model strikes a balance between speed and accuracy for our needs. Once the model is loaded, we can pass the audio from the video to it, allowing it to transcribe the entire audio track and return a list of segments. Each segment contains detailed information about the words spoken, including the start and end timestamps.
result = model.transcribe(audio_file)The transcription result contains multiple segments, each representing a part of the audio. This output enables us to pinpoint exactly where filler words occur in the video timeline. By iterating over these segments, we can extract the relevant parts and search for common filler words such as “um” or “uh.” The process is simple, but highly effective, as shown in the code snippet below:
 "segments = result['segments'] for segment in segments: if 'words' in segment: for
        word_data in segment['words']: word = word_data.get('text', '').lower() if word == "um":
        filler_intervals.append((word_data['start'], word_data['end'])) "
The loop iterates over each word detected by Whisper AI, checking if the word matches our target filler word, "um." If found, it captures the start and end times for that word and stores them in an interval list. These intervals are later used (and in our example we add padding after initial detection and before the end of detection for more natural flow) to precisely cut out the filler words and silence sections from the video.
This Whisper-based approach to filler word detection is both powerful, and flexible, and just too easy. By adjusting which words we search for or even combining Whisper's capabilities with silence detection, we can fine-tune our video editing process to create smoother, more concise content. This gives us full control over which parts of the audio to keep, making it easier to produce polished videos automatically. It is important to note that while automatic, the detection of silences can still take significant time for longer videos, but is miles shorter than the time spent editing by hand. Plus you can multitask!

MoviePy is a key part of the video processing pipeline in our project. It provides the tools needed to handle tasks such as cutting out silent sections and removing filler words from videos. In this implementation, we use MoviePy to manipulate video files by loading, editing, and exporting them. MoviePy’s high-level functions make it easy to cut and rearrange video clips, which is crucial for creating a polished final product.
from moviepy.editor import VideoFileClip clip = VideoFileClip(video_file_path) We start by importing the VideoFileClip object from MoviePy,
which allows us to load a video file and treat it as a manipulable object. This
object gives us access to several useful attributes, such as the duration and
audio of the video, which we use when detecting silent or unwanted sections.
 def remove_intervals(clip, intervals): edited_clips = [clip.subclip(start, end)
    for start, end in intervals] return concatenate_videoclips(edited_clips)
The function above handles the actual removal of intervals from the video. We pass
in the video clip and the intervals (such as those containing filler words or silence)
that we want to exclude. The subclip method allows us to extract segments
from the video, and the concatenate_videoclips function stitches those
remaining segments together to form the final, edited video. This method ensures that
the unwanted sections are cleanly removed, resulting in a smooth, uninterrupted video.
For example, when we detect filler words using Whisper AI and silence detection,
we store the timestamps of the filler sections. These timestamps are then passed
into the remove_intervals function, where the video is sliced and
reassembled without those portions. This automates the removal process, ensuring
efficiency and accuracy while maintaining high video quality.
 final_clip = remove_intervals(clip, filler_intervals)
    final_clip.write_videofile(output_path, codec="libx264", audio_codec="aac")
After all the unwanted sections have been removed, the resulting video clip is saved
to disk using the write_videofile method. In this example, we use the
libx264 codec for video encoding and aac for the audio, which are
standard choices for high-quality output. The final video is exported and ready for use without
any manual intervention in the cutting process.
This approach streamlines the workflow, making it easy to produce videos with minimal effort. By automating the removal of unnecessary content, the tool becomes a powerful asset for vloggers, podcasters, and others who need to edit lengthy footage quickly.
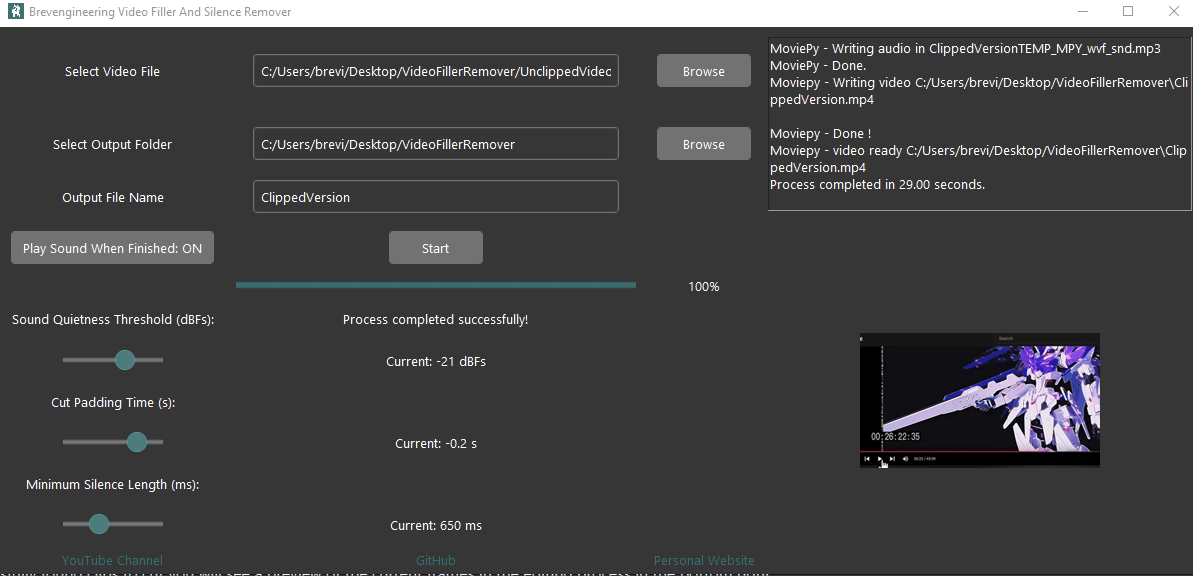
The app here is designed with a Tkinter GUI.
Tkinter is a Python library used for creating really simple and easy graphical user interfaces (GUIs). It’s built into Python, which makes it easy to use for building desktop apps.
Tkinter allows developers to add interactive elements like buttons, sliders, labels, and text boxes to their programs.
Using Tkinter, I created a GUI that provides easy access to the video processing features.
There are 4 core areas I developed for the GUI:


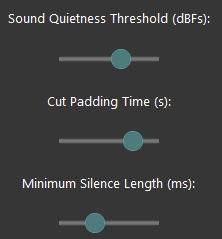
The first slider is for the Sound Decibel Threshold, which adjusts the sensitivity of the program to sound. By setting a higher threshold, the program will ignore quieter noises and focus only on louder sounds that are likely to be speech or important audio. This is particularly useful in videos where there’s a lot of background noise, as it helps the app avoid accidentally removing useful sounds.
    # Sound Decibel Threshold Slider
    sound_decibel_label = ttk.Label(root, text="Sound Decibel Threshold")
    sound_decibel_label.pack()

    sound_decibel_slider = ttk.Scale(root, from_=0, to_=100, orient="horizontal", length=300)
    sound_decibel_slider.set(30)  # Default value
    sound_decibel_slider.pack()
The second slider is the Padding Slider, which is used to add a buffer around silent sections before they’re removed. This ensures that when a silent segment is removed, the transition between the remaining audio parts is smooth and not jarring. This padding helps the app create a more natural, flowing audio track.
    # Padding Slider
    padding_label = ttk.Label(root, text="Padding (seconds)")
    padding_label.pack()

    padding_slider = ttk.Scale(root, from_=0, to=5, orient="horizontal", length=300)
    padding_slider.set(0.5)  # Default value
    padding_slider.pack()
The third slider controls the Minimum Silence Length, which determines the threshold for how long a section of silence must last to be considered for removal. This slider allows the user to define how long the silence should be to get rid of unnecessary pauses in speech. If the silence length is below this threshold, it won't be considered for removal.
    # Minimum Silence Length Slider
    min_silence_length_label = ttk.Label(root, text="Min Silence Length (seconds)")
    min_silence_length_label.pack()

    min_silence_length_slider = ttk.Scale(root, from_=0, to=10, orient="horizontal", length=300)
    min_silence_length_slider.set(1)  # Default value
    min_silence_length_slider.pack()
Other core features of the GUI are for running and executing the core editing scripts. The Process Video button triggers the video processing function, where the settings from all three sliders are passed to the core algorithm that removes the filler words and silences from the video.
    # Process Button
    def process_video():
        min_silence = min_silence_length_slider.get()
        decibel_threshold = sound_decibel_slider.get()
        padding = padding_slider.get()

        # Call the function to process the video with the selected parameters
        process_filler_remover(min_silence, decibel_threshold, padding)

    process_button = ttk.Button(root, text="Process Video", command=process_video)
    process_button.pack(pady=10)
Below is an example of an input video with some music that I play and pause to replicate a video with silences. Check out the Unclipped video below.
The clipped version of the video above that was trimmed with my video filler remover tool is below. You can see that the pauses from the unclipped version are either completely gone or shortened significantly.
If you want to see a full video with speaking - checkout my youtube channel where I talk about this very project and go through the code. The code requires some setup and may require difficult system changes to work, so I decided to create an executable version that can be used out of the box. See my github for the code and the EXE release to learn more.
All source code for this project can be found on my github page.