Laser Cutter: Shayvin Engraver and Laser Cutting Machine

Project Description

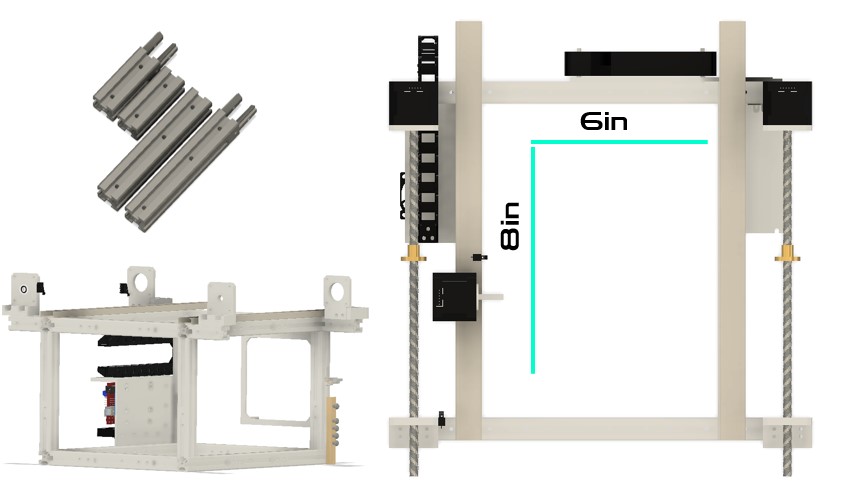
The purpose of this project was to create a 2 DOF laser cutter and engraver machine from scratch. Ideally, I wanted to make a machine that could engrave and cut wood, plastic, and other materials, and be made soley from 3D printed parts for the frame and other custom parts. I wanted to use an off the shelf laser module and stepper motors to make the machine as simple as possible. Given that the parts were all 3D printed, I wanted to make the machine as modular as possible so that it could be easily assembled and disassembled, but this came at the cost of some rigidity and vibration dampening.

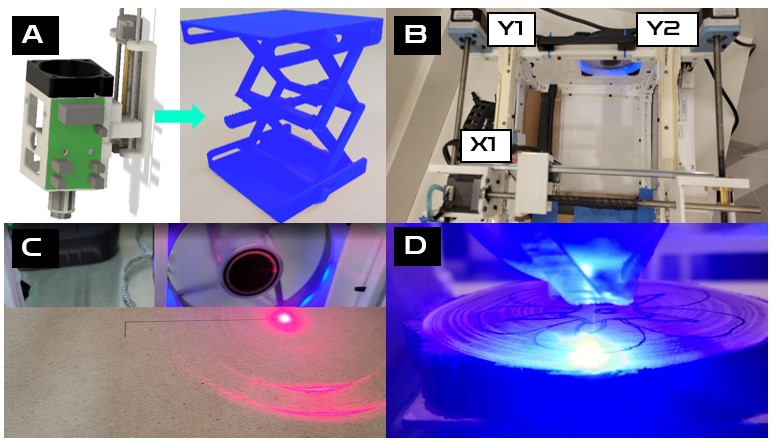
In this project I will go over the design of the machine, the control system, and the results of the project, and how I over came the vibration challenges, accuracy, and other issues. I intentionally did little research when I started this project, as I wanted to see how well I could design a machine from scratch without any prior knowledge about laser cutter mechanics. I have used laser cutters in industry and school before, but they have always been large scale machines that have tons of bells and whistles auto integrated. Mostly plug and play. The laser cutter I am building should cost less than $200 to build and capable enough to cut thin wood to use in framing for future projects.

Shayvin Engraving
Fig.1 Shayvin Engraving.

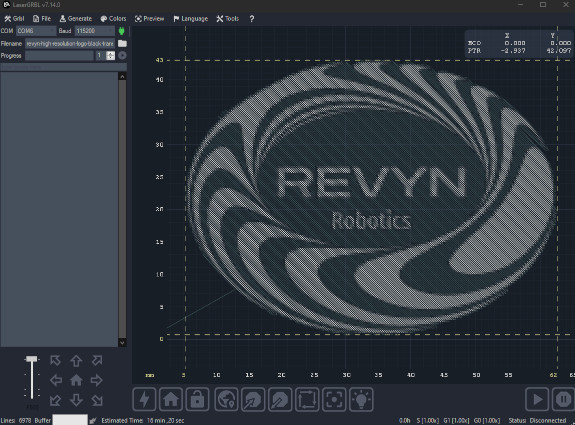
Another motivation for this project was to create a machine that could be used to make small wood burning engravings as a small side business. I've called this business Shayvin Engraving and you can find my etsy shop here. The name “Shayvin” is a blend of my name and my wife's.

Laser cutter framing
Fig.2 Laser Cutting Fittings and Frame.

Laser Cutter Design

The structural system is based on 1-inch square modular beams, all 3D printed in white PLA, with interlocking teeth that let them snap together like a simplified 80/20 system. I designed a library of reusable corner brackets, plates, and fasteners to go along with the beam system. It’s not perfect, but it let me rapidly adjust the height, width, and layout of the machine during prototyping. The engraving area came out to about 6 by 8 inches (accounting for the size of the laser module, limit switches, and some padding from the edges in case of motor overshoot), which is adequate for the kind of small table top projects I typically work on.

Early on, I tried building the machine around a small red laser diode mounted to a CD-ROM stepper mechanism for Z control. It was kind of fun to tinker with, but the red laser just wasn’t powerful enough to get clean burns and the z axis control from the CD ROM Stepper had too small a range to prove useful. I decided to scrap the CD ROM Stepper and limit the motion to 2DOF in only X and Y. Instead I added a manual z-axis via a 3D printed scissor jack that I found worked quite well. With this I can simply lay the work piece on top of the jack and adjust the height of the jack relative to the laser for however close a cut i need.

After a lot of trial and error (and some very smoky failures), I eventually upgraded to a 20W 450nm blue laser module. This made a huge difference in power, but the new laser burned hot enough that I ran into scorching and soot buildup. I spent some time researching and ended up designing an air assist capsule that attaches around the laser head, powered by a cheap off-the-shelf air compressor. That one change improved cut quality dramatically as shown in figure 4. Observe the darker and orange areas that extend past the cut lines when air assist is not on.

A: Move from CD-ROM Stepper to Scissor jack. B: 3 Steppers C: Red Laser Diode. D: Blue Laser Module Upgrade
Fig.3 A: Move from CD-ROM Stepper to Scissor jack. B: 3 Steppers C: Red Laser Diode. D: Blue Laser Module Upgrade.
A: Air assist examples. Excess burning, Less burning, Nozzle

Fig.4 A: Air assist examples. Excess burning, Less burning, Nozzle.

Motion is controlled using an Arduino with a CNC shield, running GRBL firmware. I power the system with a 12V 15A supply, which also supports a stepper driver cooling fan and a large CPU fan mounted at the back of the enclosure for smoke extraction. For motion, I use three NEMA 17 stepper motors: two in parallel for the Y axis, and one for the X axis. Each one is mounted on CNC rails, and all lead screws use anti-backlash nuts. To reduce mechanical play, I designed flexible PLA couplers that allow for slight misalignment while keeping everything tight. This helped minimize binding, which was a big issue in early test runs. I also added mechanical limit switches for homing the X and Y axes, and a mounted ruler on the base plate to make part alignment easier. You can find all the 3D models for the machine here on cgtrader. The wiring for the machine is simple, with the stepper drivers connected to the CNC shield and the laser module controlled via PWM signals from an Arduino nano. 3 stepper drivers are used, one for the X axis and two in parallel for the Y axis. The limit switches are connected the CNC shield as well. If you follow the documentation from GRBL, you can easily wire the machine up and get it running. But I'll address GRBL more in the next section.

CNC Wiring Diagram.

Fig.5 A: CNC Wiring Diagram.

Control Electronics & Software (GRBL + LaserGRBL)

After building the mechanical and structural parts of the machine, I needed a way to control the motors and fire the laser reliably. I began to build a python GUI with Tkinter that allowed me to control my machine, but it was very bare bones. I could easily keep developing that tool for the next 4 months, but I figured I'd be reinventing the wheel. After some short research, I found a few packages that I thought would be perfect for my needs. Instead of developing an entire motion planning and motor control stack from scratch, I opted to use GRBL, a lightweight, open-source firmware designed specifically for Arduino-based CNC machines. GRBL interprets standard G-code and translates it into precise stepper motor signals—perfect for the X and Y axis control I needed for the laser. You can find the GRBL source code on Github.

GRBL Logo

Fig.6 GRBL Logo.

GRBL runs on an Arduino Uno paired with a CNC Shield v3. The CNC Shield provides stepper driver sockets and pin breakouts for limit switches, spindle enable, and more. Once flashed to the Arduino, GRBL handles all the motion timing and G-code interpretation in real time, meaning I could focus on sending instructions instead of managing acceleration curves or step pulses myself. I wired the stepper drivers directly into the CNC shield and added mechanical limit switches on the X and Y axes to allow homing.

While GRBL runs on the Arduino itself, I needed a user-friendly interface on my PC to send G-code, adjust speeds, and preview toolpaths. That’s where LaserGRBL comes in. LaserGRBL is a free and incredibly lightweight G-code sender and control interface tailored specifically for laser engravers running GRBL firmware. It provides real-time control over laser power, jogging, homing, G-code file streaming, and even raster image conversion for engraving bitmap images.

LaserGRBL ended up replacing the custom Python/Tkinter GUI I had originally started writing. I realized that I could spend a month rebuilding features that LaserGRBL already had—like visual G-code previews, safety overrides, real-time position tracking, and configurable laser power control via M3/M5 commands. It made my workflow way more efficient and allowed me to focus on the mechanical build and part design rather than reinventing the control software.

LaserGRBL Interface

Fig.7 LaserGRBL Interface.

Together, GRBL and LaserGRBL gave me a full-stack control system: low-level stepper control on the Arduino side, and high-level job planning and execution from my PC. This combination let me go from CAD to G-code to a clean wood burn in just minutes. It’s not perfect, but the out of-the-box functionality makes up for any minor quirks.

Revyn Logo burned in a wood round

Next Steps

This project was a total success! I was able to create a fully functional laser cutter that could be used for small table top projects. It works and can also cut thin sheets of wood. I am excited to see if it will be useful for using in other projects. I also hope that I can improve a few of the design issues. I have noticed that the Air Assist could be stronger and the nozzle could be better attached and aimed. I also think while the scissor jack works well, it could be improved to be more rigid and have a larger range of motion. I also recently got some orange 450nm saftey glass that i want to use to make a safety enclosure for the laser cutter. The fans I installed also are not as strong as I would like. Other than that, I am very happy with the results of this project and I am excited to see how it will be used in the future. Check out this video of the laser cutter in action:

Back to Top